Pro’s and Con’s of kitchen counter top options

From http://www.houzz.com/ideabooks/1623075

USA and US$ figures, so likely to be a bit different in the UK:

Granite

Pros: Granite’s beautiful mottling and the host of colors and patterns found in nature make each piece one of a kind. It stands up well to splashes, knife nicks, heat and other wear and tear.

Cons: Like most stone, granite must be sealed every so often to avoid stains. And its heaviness means you’ll need very sturdy cabinet boxes to support the weight.

Cost: $35 to $100 per square foot, installed

Solid Surfacing

Made primarily from acrylic and polyester, solid surfacing first was sold under the brand name Corian, which is often (erroneously) used as a generic term for it. Today, it’s made by a host of manufacturers and has enjoyed steady popularity over the years.

Pros: Because solid surfacing is nonporous, it’s virtually maintenance free — no sealing or special cleaning required. Although it can be susceptible to scratches and burns, those are easy to sand out. Color and pattern options are extensive, and because you’re not trying for the look of a natural material, you can experiment with vibrant hues such as turquoise or tomato red. Seamless installation means there are no cracks to trap dirt and debris.

Cons: Solid surfacing can have a patently artificial look and feel, yet can approach the price of natural stone. As mentioned above, it doesn’t stand up to hot pans or sharp knives as well as other materials.

Cost: $35 to $100 per square foot, installed

Quartz Surfacing

Crafted of resin and quartz chips tinted with color, quartz surfacing (also called engineered quartz or engineered stone) is a good compromise between the beauty of stone and the easy care of solid surfacing.

Pros: Quartz surfacing has the same advantages as solid surfacing with regard to maintenance. As an engineered product, it’s available in a far greater range of colors and patterns than natural stone.

Cons: This material doesn’t have the natural variegation of granite, so it may be evident that it’s an engineered product. It’s relatively pricey, although its durability can make it a worthwhile investment.

Cost: $40 to $90 per square foot, installed

Marble

Is there anything that looks and feels more glamorous than a marble countertop? Peerless in terms of its luminescence and distinctive veining, it’s an ultratraditional choice.

Pros: Nothing beats marble for sheer elegance. It stands up to heat well, and because it remains perennially cool, it’s a traditional choice for pastry and baking stations (read: Dough won’t get too soft).

Cons: Marble is very susceptible to stains, even with sealing. For that reason, it’s not often used throughout an entire kitchen — most homeowners limit it to one or two small areas. It can also scratch and chip.

Cost: $40 to $100 per square foot, installed

Tile

Modular and inexpensive, ceramic and porcelain tile offers nearly limitless options for colors and designs. Tile works with almost any kitchen style, from country to majestic Old World.

Pros: It holds its own against heat and sharp blades, and resists stains. If one or two tiles chip or crack, they’re fairly easy to replace.

Cons: Tile’s uneven surface can make it difficult to balance a cutting board or roll out a pie crust. Unsealed grout is prone to staining; standing moisture can damage it and contribute to bacterial growth.

Cost: $10 to $80 per square foot, installed

Laminate

Made of paper blended with resins and fused to particle board, laminate has been a kitchen mainstay for decades. In the past, it hasn’t always had a reputation as stylish, but that’s changing: The latest designs on the market mimic stone, butcher block and other pricier surfaces.

Pros: Laminate is one of the most affordable countertop materials, so it’s a good choice if your budget is tight. It’s low maintenance and easy to clean. Its light weight doesn’t require the support of a thick cabinet base.

Cons: Laminate is prone to scratching, burns and, in some cases, staining. With wear and moisture exposure, the layers can peel. Because of the raw particle board core, you can’t use laminate with undermount sinks, and it’s also difficult to repair if it gets damaged.

Cost: $10 to $30 per square foot, installed

Soapstone

Although it’s in no danger of overtaking granite, soapstone has come into its own as a countertop material. It offers subtle, nuanced beauty yet feels humbler than granite or marble.

Pros: Soapstone has a natural softness and depth that fits very well with older and cottage-style homes. Although it usually starts out light to medium gray, it darkens with time. (Most people enjoy the acquired patina, but you may consider this a con.)

Cons: Soapstone needs polishing with oil to keep it in top shape. It can crack over time, and it can’t handle knife scratches and nicks as well as some other types of stone. The natural roughness of its surface can scuff glassware and china.

Cost: $70 to $100 per square foot, installed

Stainless Steel

Once found mostly in commercial kitchens, stainless steel has slipped into vogue within the past two decades. These countertops are custom made to fit your kitchen, so you’re guaranteed a tailored look.

Pros: There’s a reason stainless steel is used in restaurants and other high-traffic kitchens: It’s nearly indestructible, and it resists heat and bacteria. It also provides a very distinctive look that feels appropriate in contemporary and industrial-style kitchens.

Cons: Fingerprints show and must be wiped off frequently, and stainless steel can also dent. It can be loud as pots, pans and dishware clang against the surface. Chemicals can affect its color and cause unwanted etching. Stainless steel is extremely expensive due to the custom fabrication.

Cost: $65 to $125 per square foot, installed

Concrete

Think concrete is just for floors? Think again. Slightly edgier than other materials, concrete countertops have an industrial chic that fits right into a loft or adds interest to an otherwise traditional space.

Pros: Concrete is extremely versatile: It can be cast in any shape and custom tinted any shade you wish. You easily can add unique inlays, such as glass fragments, rocks and shells. Concrete stands up well to heavy use, although it isn’t as heat resistant as some other surfaces.

Cons: Because it’s porous, concrete will stain without frequent sealing. With time and settling, small cracks can develop. Concrete is extremely heavy and will need strong support beneath. Like stainless steel, its custom creation ups the price tag.

Cost: $75 to $125 per square foot, installed

Butcher Block

Butcher block has a classic appeal and always looks fresh. It’s especially fitting for traditional, country and cottage-style kitchens.

Pros: Many homeowners like butcher block’s warm, natural appearance and variegated wood tones. Although knives scratch it, many people like the shopworn look it develops — after all, it’s what chopping blocks have been made of for years. But you can also sand scratches down with ease.

Cons: Wood swells and contracts with moisture exposure, and butcher block is no exception. It harbors bacteria and needs frequent disinfecting. Oiling is a must to fill in scratches and protect the surface.

Cost: $35 to $70 per square foot, installed

Paper Composite

Paper countertops? You read it right. Created from paper fibers mixed with resin, this surface is ecofriendly and a whole lot more durable than it sounds.

Pros: Paper composite evokes the look of solid surfacing or laminate but with a warmer sensibility. It’s surprisingly hardy and can withstand heat and water admirably. It’s also a great deal lighter than natural stone or concrete.

Cons: The material isn’t scratchproof and is susceptible to chemical damage. It needs an occasional rubdown with mineral oil, and even sanding, to refresh it. Although it sounds as though it would be a lower-budget option, it isn’t (unless you install it yourself).

Cost: $85 to $125 per square foot, installed


Hot water heat recovery

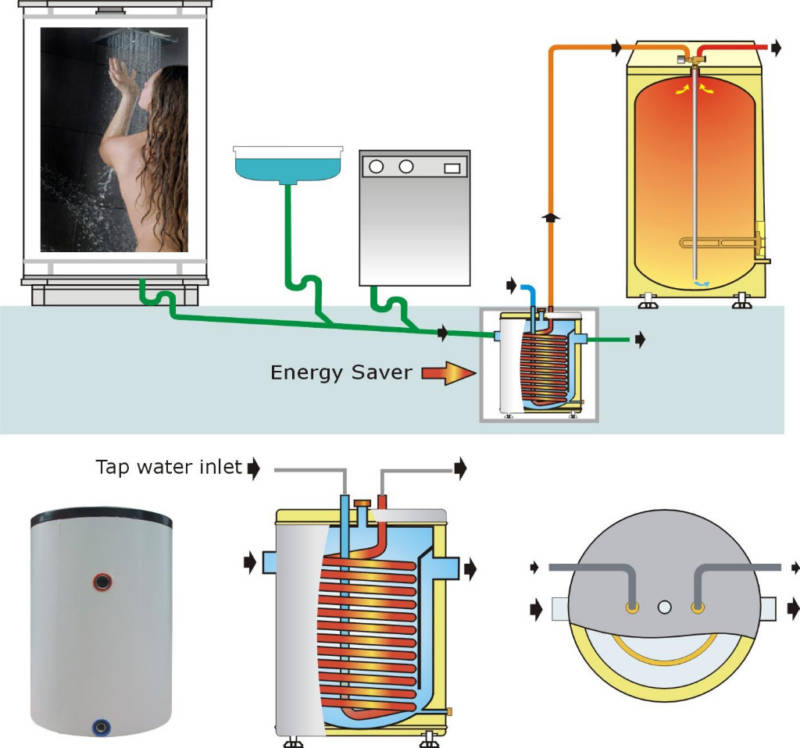
What device(s) to put where to recapture as much of the heat from waste / grey water needs a decision.

The solutions from www.recoupenergysolutions.co.uk are clearly all very efficient and appear to be the same or similar to those that are well used in the US, where a lot of properties have their heating systems in the basement.

They are based on an “instant” transfer of the waste water heat to the mixer in the shower and also to the cold water feed to the water heating system.

BUT, the planned house will have clothes washing machines, a dishwasher and 2 showers on the ground floor. Being on the ground floor they wouldn’t work with all the recoupenergy solutions. Also a washing machine, dishwasher, bath (or hot tub) generates the waste water, some time after the hot water tank has been re-filled with mains cold water.

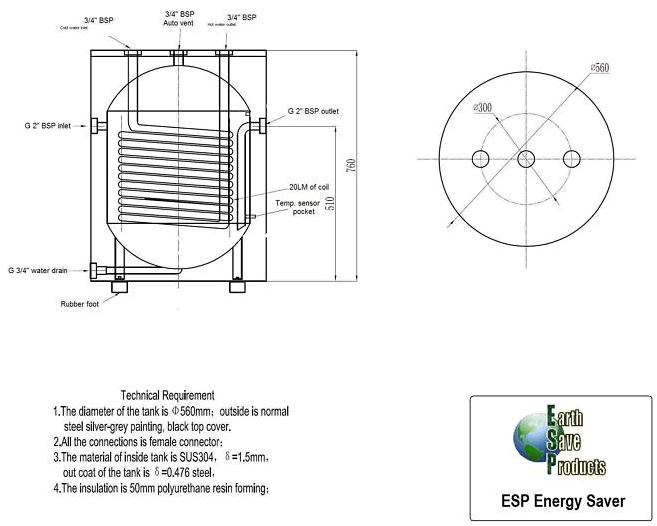
So in those circumstances, the www.esavep.com/products/hot-water-cylinders Heat Squirrel (scroll to the bottom) could be better and could provide a single (so a lot cheaper) whole house solution for all waste / grey hot water heat recovery. They are about £399 (not installed). The heat squirrel has a 120 litre capacity.

A key consideration / idea will be:

Can the waste water input be regulated so that only waste water that is warmer than the water in the heat squirrel is let in to it?

It seems that for a shower, the recoupenergy solutions will be the most efficient, but for the whole house, and the total cost, a single heat squirrel could be better than a heat squirrel and one or more recoupenergy solutions.

Heat Squirrel Schematic

Heat Squirrel - schematic
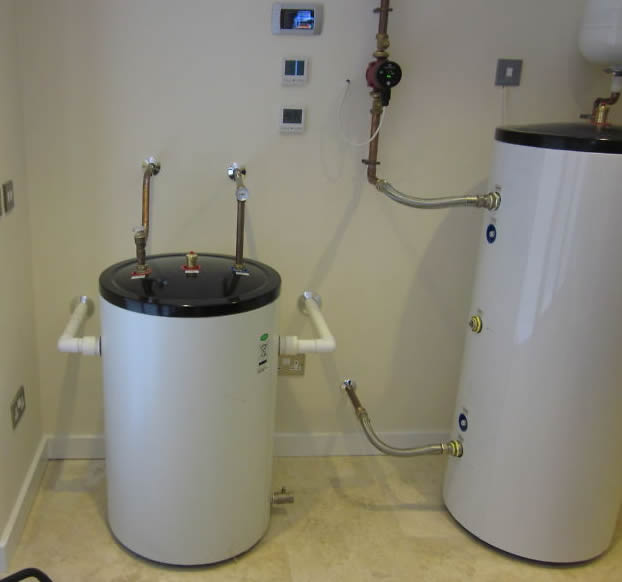
Heat Squirrel - installed

Frame colour – RAL 5007

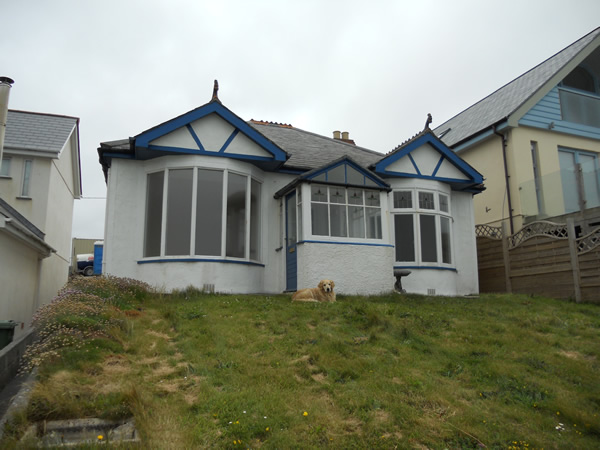
As per the planning application, the triple glazed windows are going to be framed in a grey / blue that ties in with the current grey / blue colouring of the current (original) Silver Spray building:

Silver Spray from the road (Google Earth)

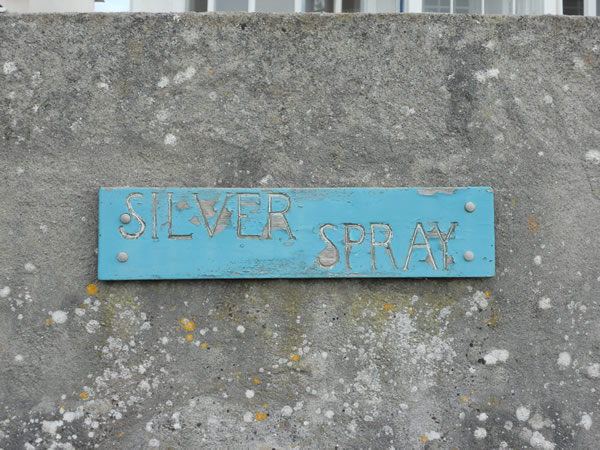
The front garage and sign are a lighter blue than the blue on the building:

Silver Spray sign

DSCN0492_600w

The surrounding houses have also gone for shades of blue:

Neighbouring blues

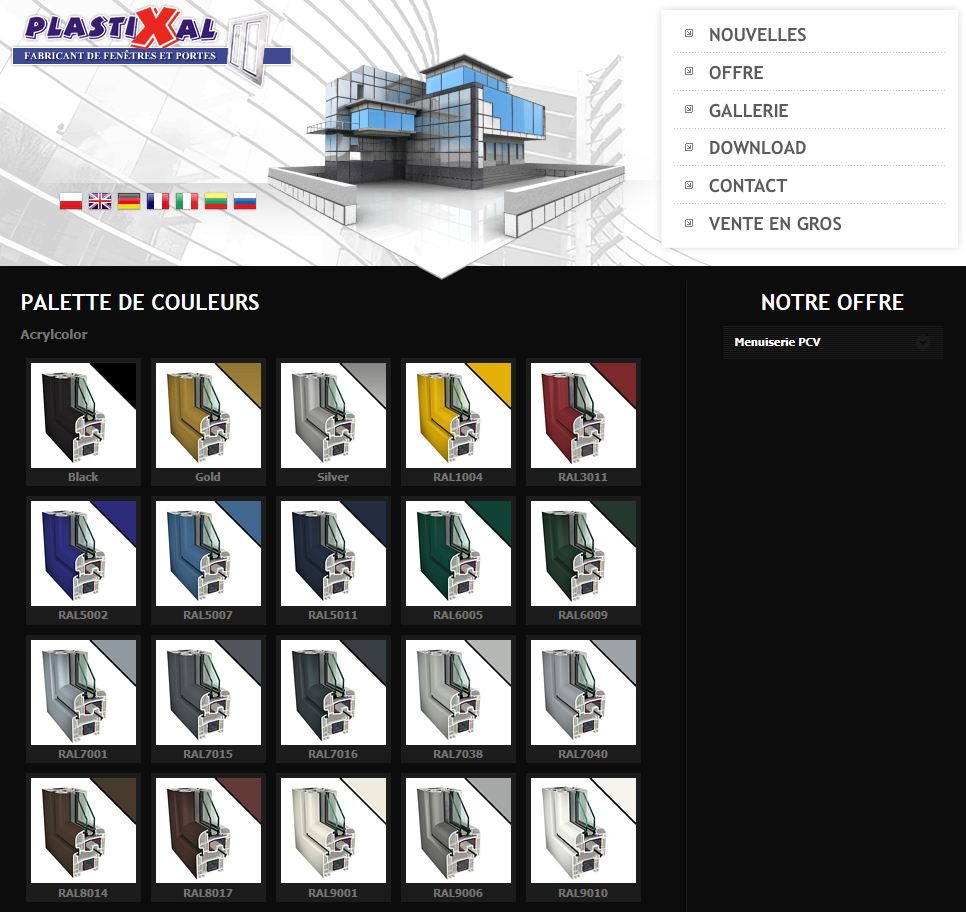
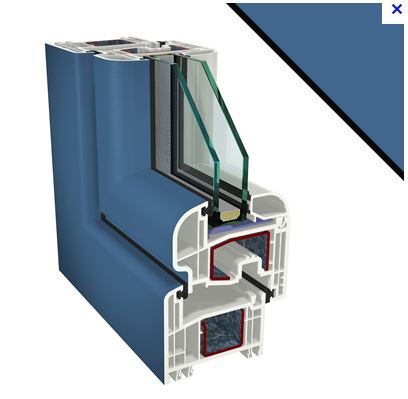
By going to Silver Spray and comparing the colours to a RAL colour chart, the colour that seems the best match is RAL 5007.

It’s hard to show this on a screen, as different monitors and different graphics cards will show the same colour differently. But here are some attempts. The first is from a Google image search on “RAL 5007”.

RAL 5007 image search on Google

Then from a window company (http://www.plastixal.pl/www/fr/425,palette_de_couleurs.html) that shows different painted frames (well the corner, so the colour impact is bigger than it’ll actually be !).

RAL 5007 for glazing frames - 03

RAL 5007 for glazing frames - 02

RAL 5007 colour swatch


Kitchen layout planning

Some tips on “How to Plan a Kitchen Workflow That Works” from http://www.houzz.com/ideabooks/5650992/:

  • Aim to have at least 18 inches of counter space on either side before putting in other appliances — with the exception of an undercounter dishwasher, of course, which works perfectly right next to the sink.
  • put counters around the refrigerator too, so there’s room to set down items when raiding the fridge.
  • While Alper likes putting a cooktop on an island, so the cooking is integrated into socializing, others like that space to be completely clear.

and ideas to “Stash Small Kitchen Appliances” from http://www.houzz.com/ideabooks/5656156/:

  • Don’t let these clutter up the surfaces.

stash kitechen appliances - 01

Article on the pro’s and con’s of different carpet types

http://www.houzz.com/ideabooks/1407736?utm_source=Houzz&utm_campaign=u76&utm_medium=email&utm_content=gallery22

WOOL
Pros

  • Hides soil
  • Strong, elastic and resilient; great for heavy traffic
  • Responds very well to cleaning, as moisture makes the fiber swell and release dirt
  • Naturally flame retardant
  • Neutralizes indoor air contaminants and does not reemit them
  • Environmentally friendly

Cons

  • High cost
  • Prone to distortion by excess agitation
  • Stains easily, due to its absorbency and ease of dyeing
  • Very sensitive to chlorine bleach


NYLON

Pros

  • Most commonly used fiber; readily available in a wide range of colors and textures
  • Good elasticity — very important in heavy traffic areas where furniture may be dragged across the carpet
  • Abrasion resistant, surpassing even wool
  • Wear guaranties often available
  • Resilient; can be crushed for long periods and regain its original shape
  • Responds very well to most professional cleaning methods and treatments

Cons

  • Can have problems with bleaching, fading, urine reactions and so on
  • Synthetic, so it off-gases


SISAL
Pros

  • Can stand up to high traffic; good for stairs
  • Gives your room a great natural look while adding texture
  • Biodegradable and nontoxic

Cons

  • Uncomfortable against bare skin
  • Can be pricey (but generally less so than wool)
  • Susceptible to moisture damage
  • Can be difficult to clean

Sewage treatment

Although the main pipe that goes from Perranporth to the sewage treatment plant by Cligga goes past the front of the house, that is under pressure and isn’t a pipe we can discharge into.

At the moment Silver Spray is a soakaway !

So, as the house is being “upgraded” we’ll be fitting an on-site sewage treatment plant. These treat the toilet waste and to a level where the water meets the rules to be discharged into the groundwater.

This is what the neighbouring properties all have.

Next door to the east, Ramoth have a Klargester BA 450 BioDisc (now part of Kingspan Environmental) unit, that was installed by Dorset based Environmental Drain Services Ltd.

Talking to Environmental Drain Services:

  1. As it’s a treatment plant and not a septic tank the 7m minimum distance from a habitable dwelling rule does not apply.
  2. You need to be able to, on-going, access the lid to get into it. So you can build decking etc over it, but you can’t stand, drive or put earth over it.
  3. We should be able to rely on the percolation test / survey done for Ramoth way, as this is just next door. It’d be very unlucky for this to not be indicative of the Silver Spray ground.
Talking to Mark at Ramoth, there is not only the Klargester unit, with it’s small power supply, but the outlet feeds into a series of underground trenches, that in their case are closer to the house than the Klargester. These trenches are rock filled to help the distribution of the discharged treated water.


SAP calculations (Air leakage, U-values & thermal bridging)

As we head towards sending in the planning permission (we’ve had 2 positive pre-planning meetings), the design has been sent for a preliminary SAP analysis.

A fundamental objective is to create a thermally efficient building, so that over it’s lifetime, the amount of energy to keep the interior at a comfortable temperature and humidity more than offsets the cost (money and environmental cost) to achieve this efficiency.

In crude financial terms, the cost of heating an uninsulated house is nearly three times that of heating a modern well insulated property of the same living area.

Heated buildings loose energy in 3 ways:

  1. Air leakage through holes (hence an airtest and an “air-tight” building).
  2. Through the fabric of the building. The u-values of the materials measure how much heat is lost through them. This is primarily the walls, floors, windows, doors and roof of the building.
    The lower the U-value, the better that section of the structure. For example, a wall with a U-value of 1.0 will lose heat twice as fast as a wall with a U-value of 0.5.
  3. Through the cold bridges between the different elements. These are the Ψ (psi) values.
    – “Thermal bridging occurs where the insulation layer is penetrated by a material with a relatively high thermal conductivity.”

The SAP assessor will look at all of these. They will multiply the Ψ (psi) values by the total length of their construction in the building to get a y-value. The y-value is analogous to an aggregated u-value for all the junctions in the building.

What y-values are used in the SAP calculations can have a big impact on the end figure.

Either:

  1. SAP assessor can use default value of 0.15, or
  2. Calculated value using the Ψ (psi) values listed by the Building Regulations for Accredited Details (normally 0.8 or higher, or
  3. A calculated value using thermally modelled junction Ψ (psi) values, which can come out as low as 0.04 depending upon construction details used.
The difference can, apparently be the equivalent of an open garage door on the side of the building ! (best to worst).

How to Place Shower Controls

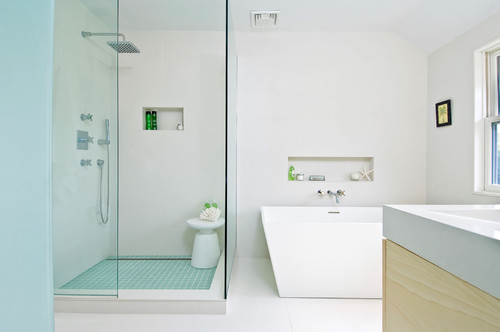
An article on “How to Place Shower Controls for Bathing Bliss” at http://www.houzz.com/ideabooks/4690224/list?utm_source=Houzz&utm_campaign=u179&utm_medium=email&utm_content=gallery14.

With some careful planning, your next shower can be a complete joy to use. No blast of cold water when you turn it on, a controlled amount of water falling from each fixture, water that doesn’t spray out the shower door and a handheld cord that doesn’t wrap around fixtures.

  • Arrange controls for multiple showerheads in an order that would make sense to a guest. eg left hand shower controls on the left, or highest (“rain head”) shower jet controls to have the highest placement.
  • Having the shower’s controls at the opening of the shower makes heating things up easy and keeps you from getting wet in the process.
  • For a handheld shower control, consider the natural arch of the cord. I’ve found the cords want to curve at roughly 8 inches (20 centimeters). Notice the perfect placement of the shower’s handheld cord in this photo. It lines up with the temperature control in middle, and the hose connects to the wall right in line with the lower control valve.
  • Have your tile layout ready if you want the hose’s connection to fall in the center of a tile or on a grout joint. Siting the connection on a grout joint is easier for the tile installer, but most times it looks best to have it entirely on a full tile.